The History
Samosas are perhaps one of the most popular South Asian snacks in existence. Globally popular, most people across the world have heard of them and tried them at some point or the other. This is far from surprising when some researchers have traced their history back to the 9th Century. The bbc.com says the first mention of the samosa is by the Persian Historian Abul-Fazl Beyhaqi in the 11th Century. However, it was not until the 1300’s that the word “samsa” became associated with the delightful snack. Samsa is the name of famous pyramids in Central Asia and It is a popular belief that the snack is shaped and named after them. Over the course of it’s history, the samosa has been mentioned in the 16th Century Mughal document Ain-i-Akbari, by the 14th Century Moroccan Explorer Ibn Battuta, the famous poet Amir Khusro and countless others. Such is the nature of this small triangular pastry, it tantalizes and captures the heart and soul of all that take a bite.
My Story
Samosa Love
I love samosas in any and all forms and shapes! Who doesn’t? The number of memories associated with them are countless! The small cocktail sized ones, sold at Karachi’s famous store Nimco, are usually in everyone’s freezer at home. Available to be fried at the drop of a hat, they come filled with potatoes, assorted ground meats and lentils. Then there are the big Punjabi Style Samosas sold by street vendors. These are purchased hot and fresh with chutney to go along with them. The perfect tea time snack and usually at everyones table in the month of Ramadan. Stuffed with spicy potatoes, the pastry like crust flaky and crisp, each bite of these is irresistable.
Learning How To Make Samosas
Living in America, I mastered the art of making the cocktail version at home a long time ago. Fortunately, spring roll wrappers make the perfect crispy crust for this variety. The Punjabi style samosas however, have evaded me simply because the pastry like dough is very time consuming and tedious to make at home. After one experiment a long time ago I decided this is one recipe I would outsource until I found an easy solution to making them.
Recipe Inspiration
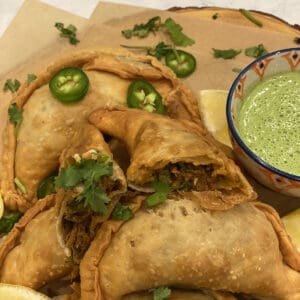
I’ve often found that empanada and samosa crust has a very similar texture. After researching and exploring, I’d been dabbling with the idea of trying premade empanada wrappers to make the traditional Punjabi samosas. When my friend Amber told me that she had eaten the most delicious shredded beef samosas at someone’s house in Sri Lanka where she lives this recipe idea came to birth. The richness of shredded beef seemed to deserve the more textured pastry like crust versus the thin crispy spring roll version. Since Amber didn’t actually have a recipe but just a concept I created my own version based on the flavors and cooking techniques I thought would pair well together. Apart from the lack of a triangle shape the crust turned out perfect and I will definitely be making these again as well as experimenting with a variety of fillings for it.
The Recipe
The main part of this recipe is preparing the Beef Tikka Masala. I have tried to simplify the recipe as much as is possible and while the cooking and prep time may seem long at first glance, there is very little effort involved. The filling can also be prepared ahead of time if necessary to help breakdown the whole process into easier tasks.
Making The Filling
Instant Pot/Slow Cooker Method
I chose to use the slow cooker function on my Instant Pot as I found it the least labor intensive method to cook the meat. You can saute the meat and set the Instant Pot to slow cook for 8 hours overnight. Come morning, all you will need to do is dry the excess liquid, shred the meat using a fork and add in the chilies and cilantro.
I personally don’t recommend using a pressure cooker (High Pressure) method for this recipe as it’s essence is in the slow cooking process. The long cooking time allows the meat to tenderize and all the flavors of the marinade to fuse well. However, if you want to try going that route traditionalcookingschool.com has a good time conversion guide to assist you.
Stove Top Method
The stove top method will likely take as long but will require more vigilance. You will need to keep adjusting water and temperature as you go along. Detailed instructions are provided in the recipe card below.
Folding The Samosas
Now that the filling is ready, it’s time to fold the samosas! Thanks to these premade empanada sheets at instacart.com (also usually available at most grocery stores under many different brand names) it’s a breeze!
Step 1 is simply to make sure that your filling is fully cooled. This prevents the dough from getting soggy. Make sure you seal the edges well. I usually press the edge down with a fork, fold the edges over and press down again to prevent them from opening up during the frying.
Cooking The Samosas
Traditional Frying
The best way to insure perfect results when frying is to use a cooking thermometer. For years I used traditional old fashioned methods to gauge if my oil was hot enough before frying things. However, I have completely converted to using my chefalarm from thermoworks.com after being introduced to it at a conference earlier this year. The alarm tells me when the oil is at the perfect temperature of 375 degrees to start frying. It also helps maintain that temperature throughout the entire cooking process (about 5 minutes) which results in perfectly fried samosas!
Baking In The Oven
If you want to go a healthier route, you can bake the samosas. Preheat the oven to 375 degrees and brush the samosas lightly with oil on both sides (this prevents the dough from drying out) and bake for 15 minutes.
Deep Frying
Heat your Deep Fryer to 350 degrees and fry the samosas in it for 5 minutes.
Air frying
Preheat your air fryer to 400 degrees. Brush both sides of your thawed samosas with oil. Cook for a total of 10 minutes, 5 minutes on each side.
Storing The Samosas
It’s best to fry the samosas as soon as you make them. The dough can start drying if they’re left uncooked for too long. If you do not plan to fry all the samosas you’ve made, I suggest you freeze them. they will last for up to 4-6 weeks in your freezer. The best method is to lay them flat on a baking tray and put them in the freezer for a few hours. Once they are fully frozen, they can be removed and placed in a ziploc bag or airtight container and stored. When you’re ready to consume them, just defrost and fry! This will insure that the filling doesn’t remain cold.
Reheating The Samosas
The best way to reheat any leftover pre fried samosas is in the oven or air fryer:
Oven - Preheat the oven to 350 degrees and heat the samosas for 10 minutes. Air Fryer - Preheat the air fryer to 350 degrees and heat it for 5 minutes.
What Chutneys To Eat With The Samosas
Some of my favorite Chutneys to eat with these samosas are:
tamarind-dipping-sauce green-coconut-chutney cilantro-mint-chutney sugar-free-imli-tamarind-chutney Raw mango chutney recipe